Chapter 3 Statistical tests
Prerequisites. Probability distributions, sampling distributions, quantiles, and the central limit theorem.
After working through this chapter, you should be able to:
- Formulate null and alternative hypotheses and define a rejection region.
- Distinguish size, significance level, power, and the two types of testing error.
- Compute and interpret a p-value for a specified test.
- Explain the terminology used for one-tail and two-tail rejection regions.
- Assess the asymptotic level and consistency of a test.
Roadmap. We begin with the logic and possible errors of statistical decisions. We then study rejection regions and p-values, introduce asymptotic properties, and finish with normality tests. Section 3.6 provides applications to size, power, and distributional testing.
A statistical test asks whether a hypothesis about an unknown parameter is compatible with the observed data. The data are random, and their distribution depends on that parameter, so the answer must account for sampling uncertainty.
For example, suppose that \(\mathbf{x}=\{x_1,\dots,x_n\}\) is an i.i.d. sample with unknown mean \(\mu\) and variance \(\sigma^2\). We may wish to assess whether \(\mu=0\) or whether \(\sigma=1\). A test translates either question into a decision rule whose possible errors can be quantified.
The hypothesis the researcher wants to test is called the null hypothesis. It is often denoted by \(H_0\). It is a conjecture about a given property of a population. Without loss of generality, it can be stated as: \[ H_0:\;\{\theta \in \Theta_0\}, \] where \(\Theta_0\) is the set of parameter values allowed by the null hypothesis. It can also be defined through a function \(h\) (say):2 \[ H_0:\;h(\theta)=0. \]
The alternative hypothesis, often denoted \(H_1\), is then defined by \(H_1:\;\{\theta \in \Theta_1\}\), where \(\Theta_1\) contains the parameter values under consideration that are not in \(\Theta_0\).3
The ingredients of a statistical test are:
- a vector of (unknown) parameters (\(\theta\)),
- a test statistic, that is a function of the sample components (\(S(\mathbf{x})\), say), and
- a critical region (\(\Omega\), say), defined as a set of implausible values of \(S\) under \(H_0\).
To implement the test, we need the distribution of \(S\) under \(H_0\). We compute \(S(\mathbf{x})\) and determine whether it lies in the critical region \(\Omega\), which contains values judged sufficiently implausible under the null. If \(S(\mathbf{x})\in\Omega\), we reject \(H_0\). The reasoning is: if the null were true, an outcome at least this unfavorable to it would be rare.
There are two possible outcomes:
- \(H_0\) is rejected if \(S \in \Omega\);
- \(H_0\) is not rejected if \(S \not\in \Omega\).
Except in extreme cases, there is always a non-zero probability to reject \(H_0\) while it is true (Type I error, or false positive), or to fail to reject it while it is false (Type II error, or false negative).
This vocabulary is widely used. For instance, the notions of false positive and false negative are used in the context of Early Warning Signals (see Example 3.1).
Example 3.1 (Early Warning Signals) Early-warning systems aim to detect crises before they occur. See, for example, ECB (2014) for applications to financial crises.
Suppose an index \(W\) tends to be large before a financial crisis. An early-warning rule predicts a crisis when \(W>a\). Lowering \(a\) produces more warnings and therefore more false positives; raising \(a\) produces fewer warnings and therefore more false negatives. The threshold determines the trade-off between the two errors.
3.1 Size and power of a test
Definition 3.1 (Size and Power of a test) For a test with rejection region \(\Omega\), define its rejection probability at parameter value \(\theta\) by \(\pi(\theta)=\mathbb{P}_\theta(S\in\Omega)\). Then:
- the size of the test is \(\alpha=\sup_{\theta\in\Theta_0}\pi(\theta)\); a test has significance level \(\alpha\) if its size is at most \(\alpha\),
- the power function is \(\pi(\theta)\) for \(\theta\in\Theta_1\); at a particular alternative \(\theta\), the probability of a type-II error is \(\beta(\theta)=1-\pi(\theta)\).
For a simple null and a simple alternative, each hypothesis specifies a single distribution. In that special case, these definitions reduce to \[\begin{eqnarray} \alpha &=& \mathbb{P}(S \in \Omega\mid H_0) \quad \mbox{(probability of a false positive)},\\ \beta &=& \mathbb{P}(S \not\in \Omega\mid H_1) \quad \mbox{(probability of a false negative)}. \end{eqnarray}\]
The power is the probability that the test will lead to the rejection of the null hypothesis if the latter is false. Therefore, for a given size, we prefer tests with high power.
In most cases, size and power involve a trade-off. In the early-warning example, increasing \(a\) reduces false positives and therefore the size of the rule, but it also increases false negatives and therefore reduces power. The next section shows how a critical region formalizes this choice.
3.2 Critical regions and p-values
The shape of the critical region depends on which values of \(S\) contradict the null. Its boundary is calibrated so that \(\mathbb{P}_\theta(S\in\Omega)\le\alpha\) for every \(\theta\in\Theta_0\), with equality at a least-favourable null value when the test has size exactly \(\alpha\). A smaller significance level therefore reserves rejection for more unusual outcomes under \(H_0\).
In this book, the terms one-sided and two-sided describe the shape of the rejection region for the chosen test statistic. A two-sided (or two-tailed) test rejects in both tails. This is common when large positive and large negative values of a symmetric statistic both count against \(H_0\), as in Figures 3.1 and 3.2. This web interface illustrates alternative situations.
In much of the statistical literature, however, one-sided and two-sided primarily describe the direction of the alternative hypothesis (for example, \(\mu>\mu_0\) versus \(\mu\ne\mu_0\)). The two usages often agree, but they are not identical. In particular, an upper-tail chi-square or \(F\) test has a one-tail rejection region even though the underlying departure from the null need not have a single direction.
Figure 3.2 also illustrates the notion of p-value for a two-sided test. The p-value is the smallest significance level at which the observed statistic would be rejected by the specified family of rejection regions. Thus, if the p-value is at most \(\alpha\), we reject \(H_0\) at significance level \(\alpha\); otherwise, we do not reject it.
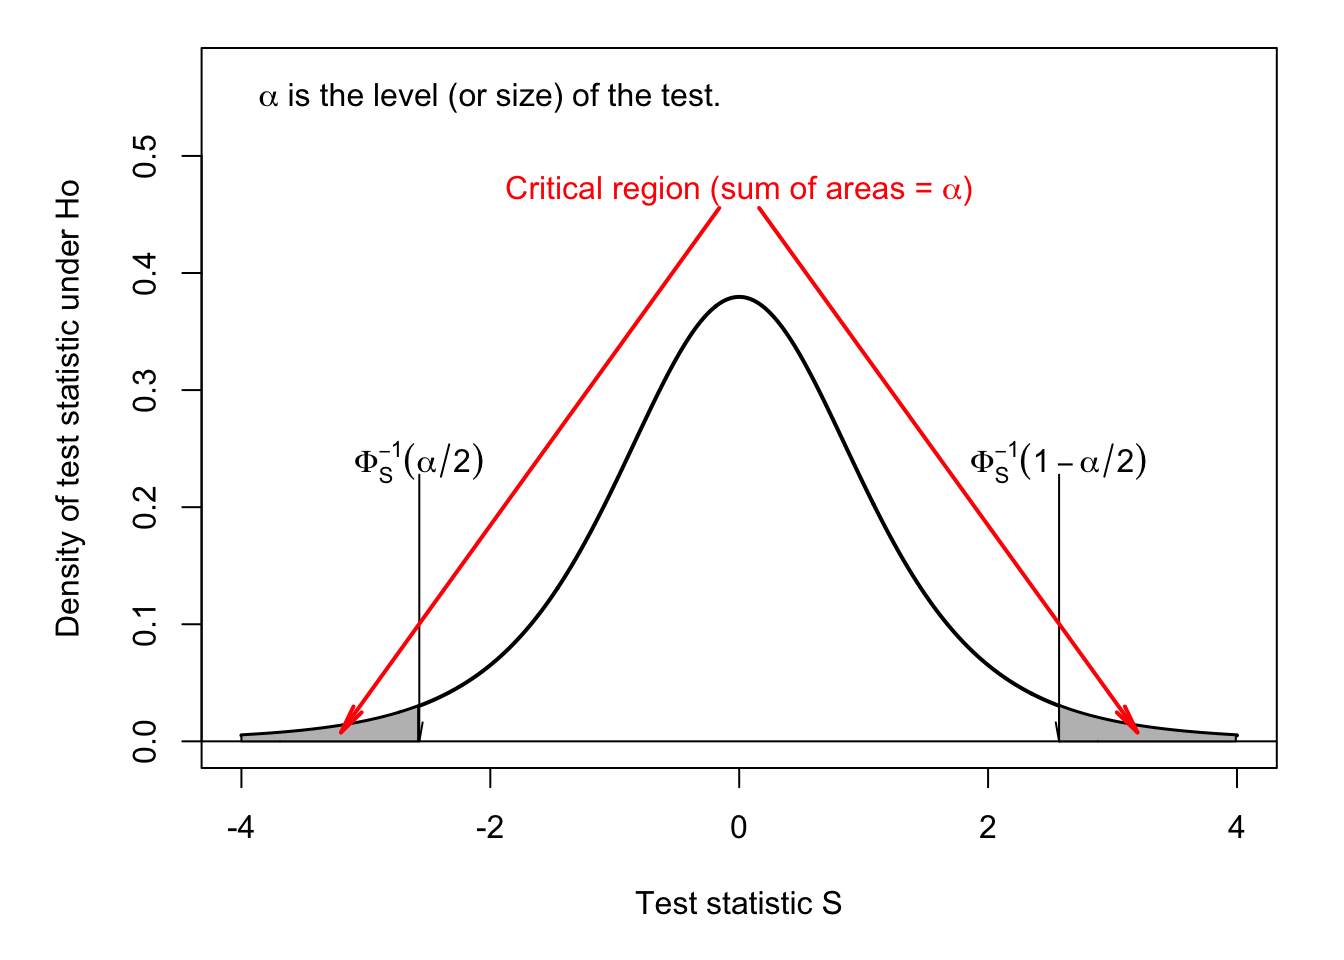
Figure 3.1: Two-sided test. Under \(H_0\), \(S \sim t(5)\). \(\alpha\) is the size of the test.
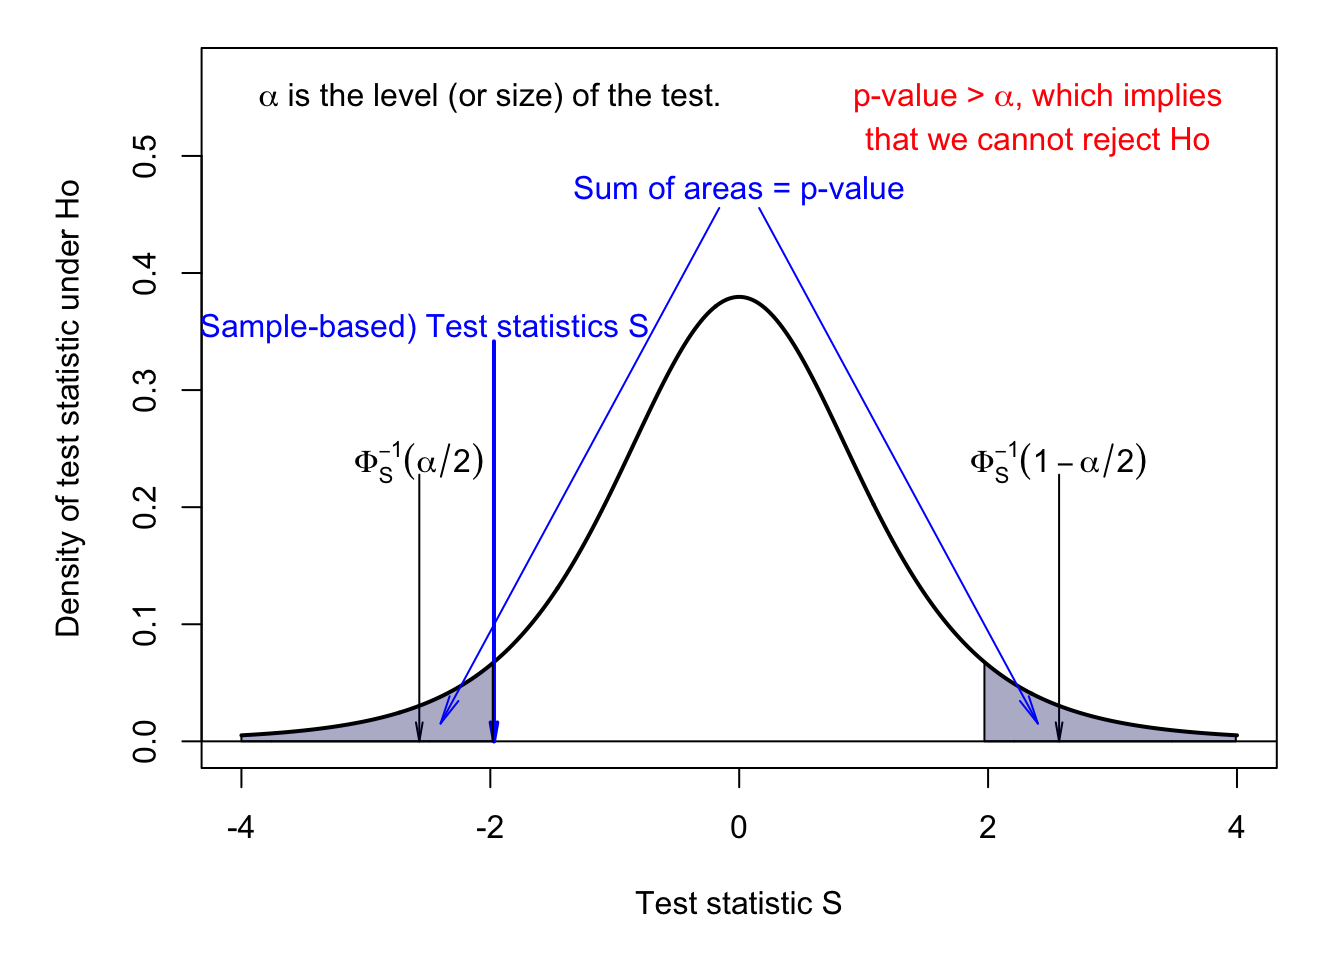
Figure 3.2: Two-sided test. Under \(H_0\), \(S \sim t(5)\). \(\alpha\) is the size of the test.
Figures 3.3 and 3.4 illustrate a one-tailed, or one-sided, rejection region in the terminology used in this course. Here only large values of a chi-square statistic count against \(H_0\), so the critical region is in the upper tail. A statistic with support on \(\mathbb{R}^+\) does not by itself force a one-tail test; the rejection region follows from which values provide evidence against the null. Figure 3.4 also illustrates the corresponding p-value.
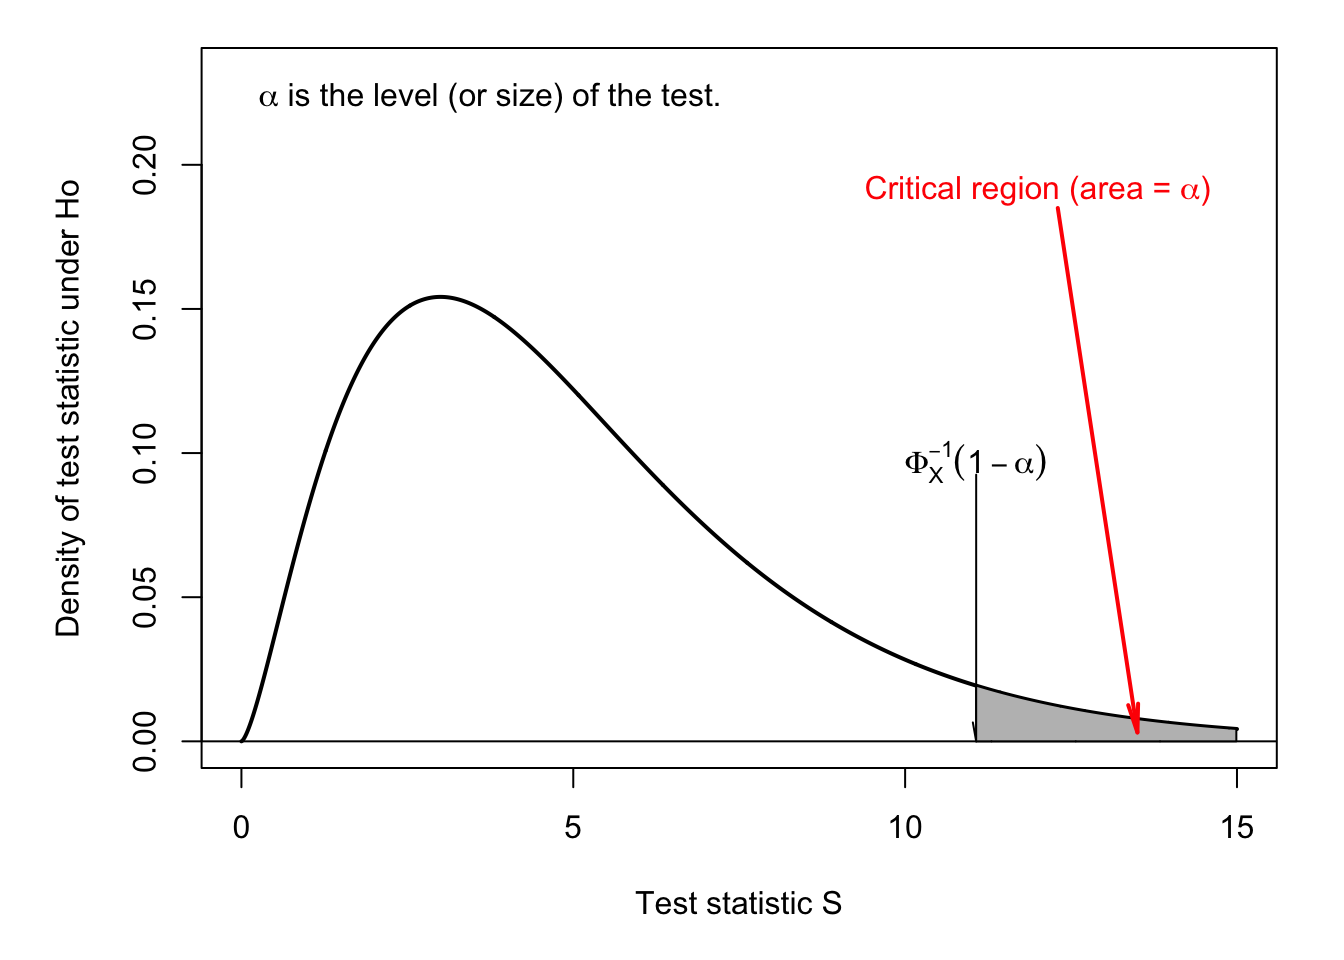
Figure 3.3: One-sided test. Under \(H_0\), \(S \sim \chi^2(5)\). \(\alpha\) is the size of the test.
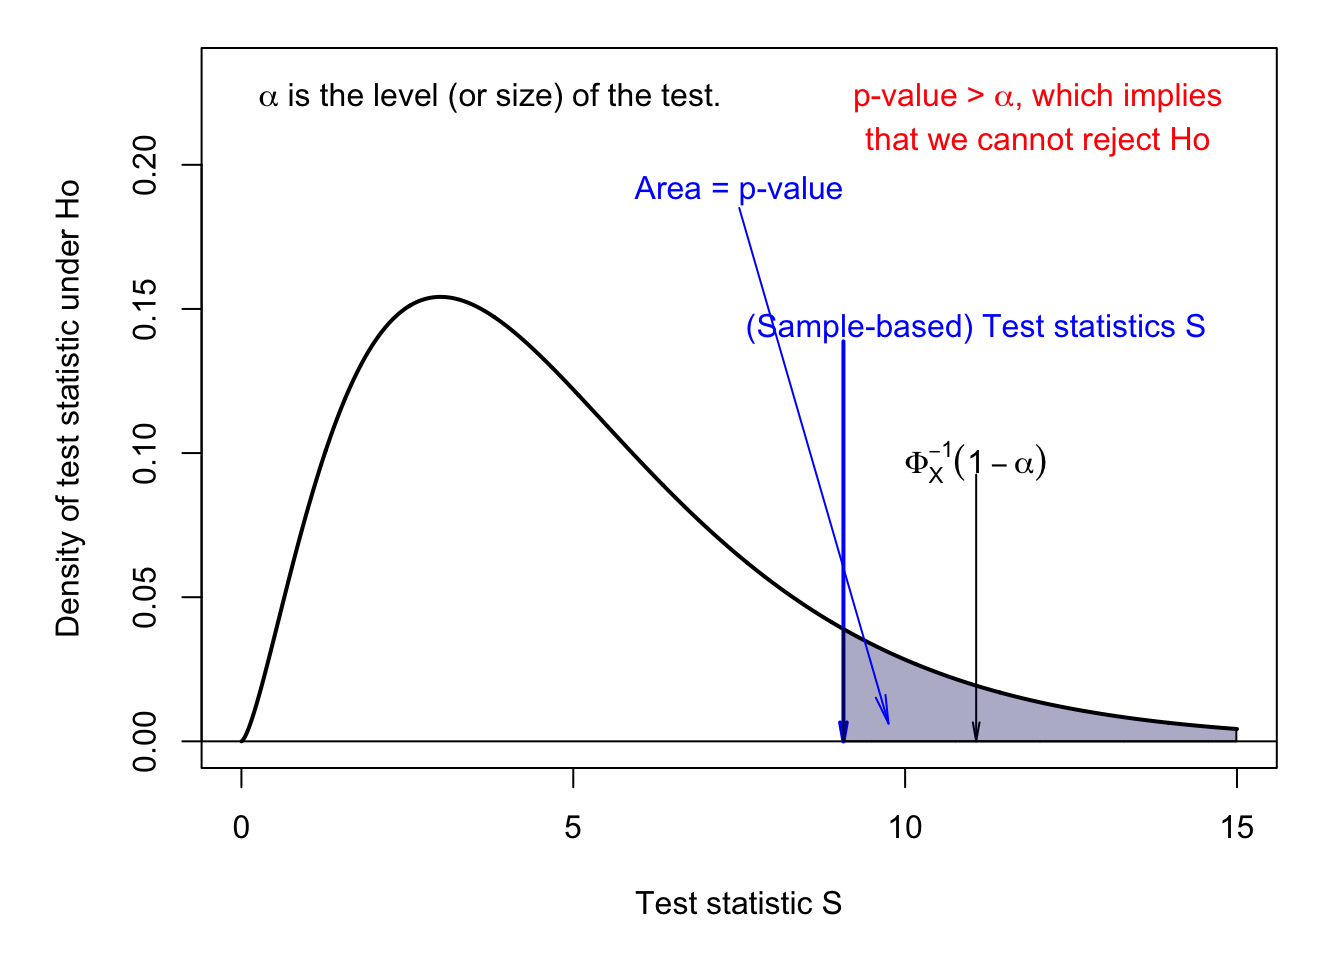
Figure 3.4: One-sided test. Under \(H_0\), \(S \sim \chi^2(5)\). \(\alpha\) is the size of the test.
Example 3.2 (A practical illustration of size and power) Consider a factory that produces metal cylinders whose diameter has to be equal to 1 cm. The tolerance is \(a=0.01\) cm. More precisely, more than 90% of the parts have to satisfy the tolerance for the whole production (say 1.000.000 parts) to be bought by the client.
The production technology is such that a proportion \(\theta\) (imperfectly known) of the parts does not satisfy the tolerance. The (population) parameter \(\theta\) could be computed by measuring all the parts but this would be costly. Instead, it is decided that \(n \ll 1.000.000\) parts will be measured. In this context, the null hypothesis \(H_0\) is \(\theta \le 10\%\). The producing firm would like \(H_0\) to be true.
Let us denote by \(d_i\) the binary indicator defined as: \[ d_i = \left\{ \begin{array}{cll} 0 & \mbox{if the size of the $i^{th}$ cylinder is in $[1-a,1+a]$;}\\ 1 & \mbox{otherwise.} \end{array} \right. \]
We set \(x_n=\sum_{i=1}^n d_i\). That is, \(x_n\) is the number of measured parts that do not satisfy the tolerance (out of \(n\)).
The decision rule is: do not reject \(H_0\) if \(\dfrac{x_n}{n} \le b\), and reject it otherwise. A natural choice for \(b\) is \(b=0.1\). However, this would not be a conservative choice, since it remains likely that \(x_n/n\le 0.1\) even when \(\mathbb{E}(x_n/n)=\theta>0.1\) (especially if \(n\) is small). Hence, if one chooses \(b=0.1\), the probability of a false negative may be high.
In this simple example, the size and the power of the test can be computed analytically. The test statistic is \(S_n=\frac{x_n}{n}\) and the critical region is \(\Omega = (b,1]\). Since \(x_n\sim\mathcal{B}(n,\theta)\), the probability of rejecting \(H_0\) is: \[\begin{eqnarray*} \mathbb{P}_\theta(S_n \in \Omega) = \sum_{i=\lfloor bn\rfloor+1}^{n}{n\choose i}\theta^i(1-\theta)^{n-i}. \end{eqnarray*}\]
For \(\theta\le0.1\), the previous expression is the probability of a type-I error at that particular null value; the size is its supremum over \([0,0.1]\), attained at \(\theta=0.1\). For \(\theta>0.1\), it is the power at that alternative. Figure 3.5 shows how this probability depends on \(\theta\) for two sample sizes: \(n=100\) (upper plot) and \(n=500\) (lower plot).
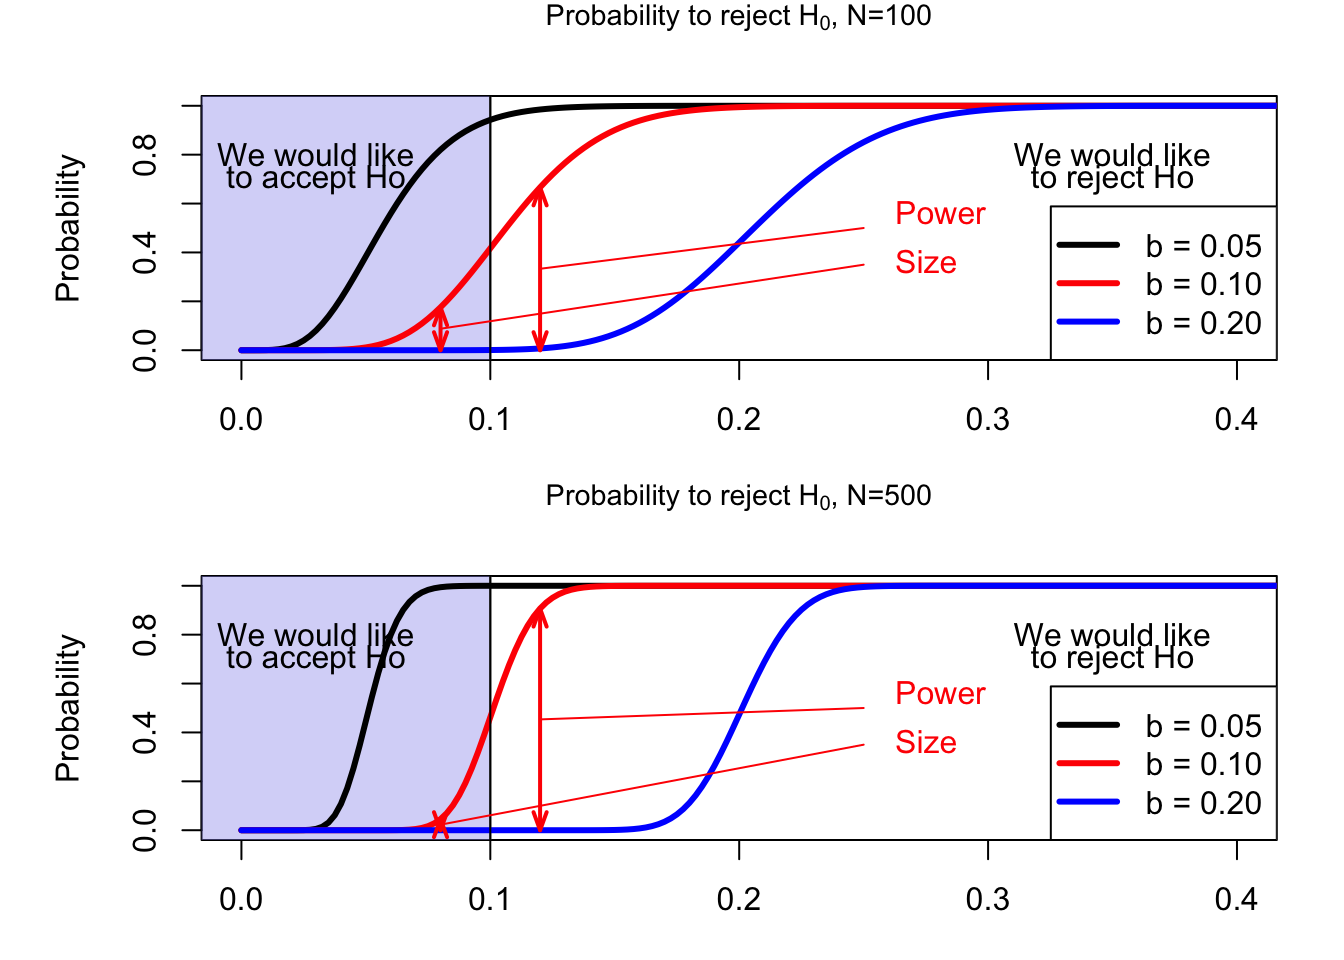
Figure 3.5: Factory example.
(Alternative situations can be explored by using this web interface.)
3.3 Asymptotic properties of statistical tests
The preceding examples use a known finite-sample distribution. More often, the null distribution of a statistic is available only as a large-sample approximation, frequently through the CLT in Chapter 2. The rejection probability may then differ from its target in a finite sample even though it approaches that target as \(n\) grows. This motivates the definition of asymptotic size.
Definition 3.2 (Asymptotic level) An asymptotic test with critical region \(\Omega_n\) has asymptotic size equal to \(\alpha\) if: \[ \limsup_{n\rightarrow\infty}\;\sup_{\theta\in\Theta_0}\mathbb{P}_\theta(S_n\in\Omega_n)=\alpha. \]
Example 3.3 (The factory example) Let us come back to the factory example (Example 3.2). Because \(S_n =\bar{d}_n\), and since \(\mathbb{E}(d_i)=\theta\) and \(\mathbb{V}ar(d_i)=\theta(1-\theta)\), the CLT (Theorem 2.2) leads to: \[ S_n \overset{a}{\sim} \mathcal{N}\left(\theta,\frac{1}{n}\theta(1-\theta)\right) \quad \mbox{or} \quad \frac{\sqrt{n}(S_n-\theta)}{\sqrt{\theta(1-\theta)}} \overset{a}{\sim} \mathcal{N}(0,1). \]
Hence, \(\mathbb{P}_\theta (S_n \in \Omega_n)=\mathbb{P}_\theta (S_n > b) \approx 1-\Phi\left(\frac{\sqrt{n}(b-\theta)}{\sqrt{\theta(1-\theta)}}\right)\). Since function \(\theta \rightarrow 1-\Phi\left(\frac{\sqrt{n}(b-\theta)}{\sqrt{\theta(1-\theta)}}\right)\) increases w.r.t. \(\theta\), we have: \[ \underset{\theta \in \Theta=[0,0.1]}{\mbox{sup}} \quad \mathbb{P}_\theta (S_n > b_n) = \mathbb{P}_{\theta=0.1} (S_n \in \Omega_n)\approx\] \[ 1-\Phi\left(\frac{\sqrt{n}(b_n-0.1)}{0.3}\right). \] Hence, if we set \(b_n = 0.1 + 0.3\Phi^{-1}(1-\alpha)/\sqrt{n}\), we have \({\mbox{sup}}_{\theta \in \Theta=[0,0.1]} \quad \mathbb{P}_\theta (S_n > b_n) \approx \alpha\) for large values of \(n\).
Controlling asymptotic size addresses behavior under the null. Under a fixed alternative, we instead want the rejection probability to approach one. A test with this property is consistent.
Definition 3.3 (Asymptotically consistent test) An asymptotic test with critical region \(\Omega_n\) is consistent if: \[ \forall \theta \in \Theta^c, \quad \mathbb{P}_\theta (S_n \in \Omega_n) \rightarrow 1. \]
Example 3.4 (The factory example) Let us come back to the factory example (Example 3.2). We proceed under the assumption that \(\theta>0.1\) and we consider \(b_n = b = 0.1\). We still have: \[ \mathbb{P}_\theta (S_n \in \Omega_n)=\mathbb{P}_\theta (S_n > b) \approx 1-\Phi\left(\frac{\sqrt{n}(b-\theta)}{\sqrt{\theta(1-\theta)}}\right). \]
Because \(\frac{\sqrt{n}(b-\theta)}{\sqrt{\theta(1-\theta)}} \underset{n \rightarrow \infty}{\rightarrow} -\infty\), we have \[ \mathbb{P}_\theta (S_n > b) \approx 1- \underbrace{\Phi\left(\frac{\sqrt{n}(b-\theta)}{\sqrt{\theta(1-\theta)}}\right)}_{\underset{n \rightarrow \infty}{\rightarrow} 0} \underset{n \rightarrow \infty}{\rightarrow} 1. \] Therefore, with \(b_n=b=0.1\), the test is consistent.
3.4 Example: Normality tests
The general ideas above can now be assembled in a concrete test. Gaussian assumptions support many exact finite-sample results, so it is often useful to assess whether a sample is compatible with normality. The Jarque-Bera test compares sample skewness and kurtosis with their Gaussian values. We first define these population and sample moments, then derive the test statistic and study its large-sample behavior.
Let \(f\) be the p.d.f. of \(Y\). The \(k^{th}\) standardized moment of \(Y\) is defined as: \[ \psi_k = \frac{\mu_k}{\left(\sqrt{\mathbb{V}ar(Y)}\right)^k}, \] where \(\mathbb{E}(Y)=\mu\) and \[ \mu_k = \mathbb{E}[(Y-\mu)^k]= \int_{-\infty}^{\infty} (y-\mu)^k f(y) dy \] is the \(k^{th}\) central moment of \(Y\). In particular, \(\mu_2 = \mathbb{V}ar(Y)\). Using these notations, \(\psi_k\) rewrites: \[ \psi_k = \frac{\mu_k}{\left(\mu_2^{1/2}\right)^k}, \]
The skewness of \(Y\) corresponds to \(\psi_3\) and the kurtosis to \(\psi_4\) (Def. 9.6).
Proposition 3.1 (Skewness and kurtosis of the normal distribution) For a Gaussian var., the skewness (\(\psi_3\)) is 0 and the kurtosis (\(\psi_4\)) is 3.
Proof. For a centered Gaussian distribution, \((-y)^3f(-y)=-y^3f(y)\). This implies that \[\begin{eqnarray*} \int_{-\infty}^{\infty}y^3f(y)dy&=&\int_{-\infty}^{0}y^3f(y)dy+\int_{0}^{\infty}y^3f(y)dy\\ &=&-\int_{0}^{\infty}y^3f(y)dy+\int_{0}^{\infty}y^3f(y)dy=0, \end{eqnarray*}\] which leads to the skewness result.
For the kurtosis, first standardize the variable. If \(Z\sim\mathcal{N}(0,1)\) has density \(f\), then \(f'(z)=-zf(z)\) and therefore \(\frac{d}{dz}(z^3f(z))=3z^2f(z)-z^4f(z)\). Integration over \(\mathbb{R}\) gives \(\mathbb{E}(Z^4)=3\mathbb{E}(Z^2)=3\), which is also the kurtosis of every non-degenerate Gaussian variable.
Let us now introduce the sample analog of standardized moments. The \(k^{th}\) central sample moment of \(Y\) is given by: \[ m_k = \frac{1}{n}\sum_{i=1}^n(y_i - \bar{y})^k, \] and the \(k^{th}\) standardized sample moment of \(Y\) is given by: \[ g_k = \frac{m_k}{m_2^{k/2}}. \]
Proposition 3.2 (Consistency of central sample moments) If the \(y_i\)’s are i.i.d. and \(\mathbb{E}(|Y|^k)<\infty\), then the sample central moment \(m_k\) is a consistent estimator of the central moment \(\mu_k\).
Proposition 3.3 (Asymptotic distribution of 3rd-order sample central moment of a normal distribution) If \(y_i\sim\,i.i.d.\,\mathcal{N}(\mu,\sigma^2)\), then \(\sqrt{n}g_3 \overset{d}{\rightarrow} \mathcal{N}(0,6)\).
Proof. See, e.g. Lehmann (1999).
Proposition 3.4 (Asymptotic distribution of 4th-order sample central moment of a normal distribution) If \(y_i\sim\,i.i.d.\,\mathcal{N}(\mu,\sigma^2)\), then \(\sqrt{n}(g_4-3) \overset{d}{\rightarrow} \mathcal{N}(0,24)\).
Proposition 3.5 (Joint asymptotic distribution of 3rd and 4th-order sample central moments of a normal distribution) If \(y_i\sim\,i.i.d.\,\mathcal{N}(\mu,\sigma^2)\), then the vector \((\sqrt{n}g_3,\sqrt{n}(g_4-3))\) is asymptotically bivariate Gaussian. Further its elements are uncorrelated (and therefore independent, because Gaussian).
The Jarque-Bera statistic is defined by: \[ JB = n \left( \frac{g_3^2}{6}+\frac{(g_4-3)^2}{24} \right) = \frac{n}{6}\left(g_3^2 + \frac{(g_4-3)^2}{4}\right). \]
Proposition 3.6 (Jarque-Bera asympt. distri.) If \(y_i\sim\,i.i.d.\,\mathcal{N}(\mu,\sigma^2)\), \(JB \overset{d}{\rightarrow} \chi^2(2)\).
Proof. This directly derives from Proposition 3.5.
Example 3.5 (Consistency of the Jarque-Bera normality test) This example illustrates the consistency of the JB test (see Def. 3.3).
For each simulated sample, we compute the Jarque-Bera statistic defined above.
Code
JB <- function(x){
  N <- dim(x)[1] # number of samples
  n <- dim(x)[2] # sample size
  x.bar <- apply(x,1,mean)
  x.x.bar <- x - matrix(x.bar,N,n)
  m.2 <- apply(x.x.bar,1,function(x){mean(x^2)})
  m.3 <- apply(x.x.bar,1,function(x){mean(x^3)})
  m.4 <- apply(x.x.bar,1,function(x){mean(x^4)})
  g.3 <- m.3/m.2^(3/2)
  g.4 <- m.4/m.2^(4/2)
  return(n*(g.3^2/6 + (g.4-3)^2/24))
}
Let us first consider the case where \(H_0\) is satisfied. Figure 3.6 displays, for different sample sizes \(n\), the distribution of the JB statistics when the \(y_i\)’s are normal, consistently with \(H_0\). It appears that when \(n\) grows, the distribution indeed converges to the \(\chi^2(2)\) distribution (as stated by Proposition 3.6). The \(\chi^2(2)\) distribution is represented in red on each plot.
Code
all.n <- c(5,10,20,100)
nb.sim <- 10000
y <- matrix(rnorm(nb.sim*max(all.n)),nb.sim,max(all.n))

par(mfrow=c(2,2));par(plt=c(.1,.95,.15,.8))
for(i in 1:length(all.n)){
  n <- all.n[i]
  hist(JB(y[,1:n]),nclass = 200,freq = FALSE,
       main=paste("n = ",toString(n),sep=""),xlim=c(0,10))
  xx <- seq(0,10,by=.01)
  lines(xx,dchisq(xx,df = 2),col="red")
}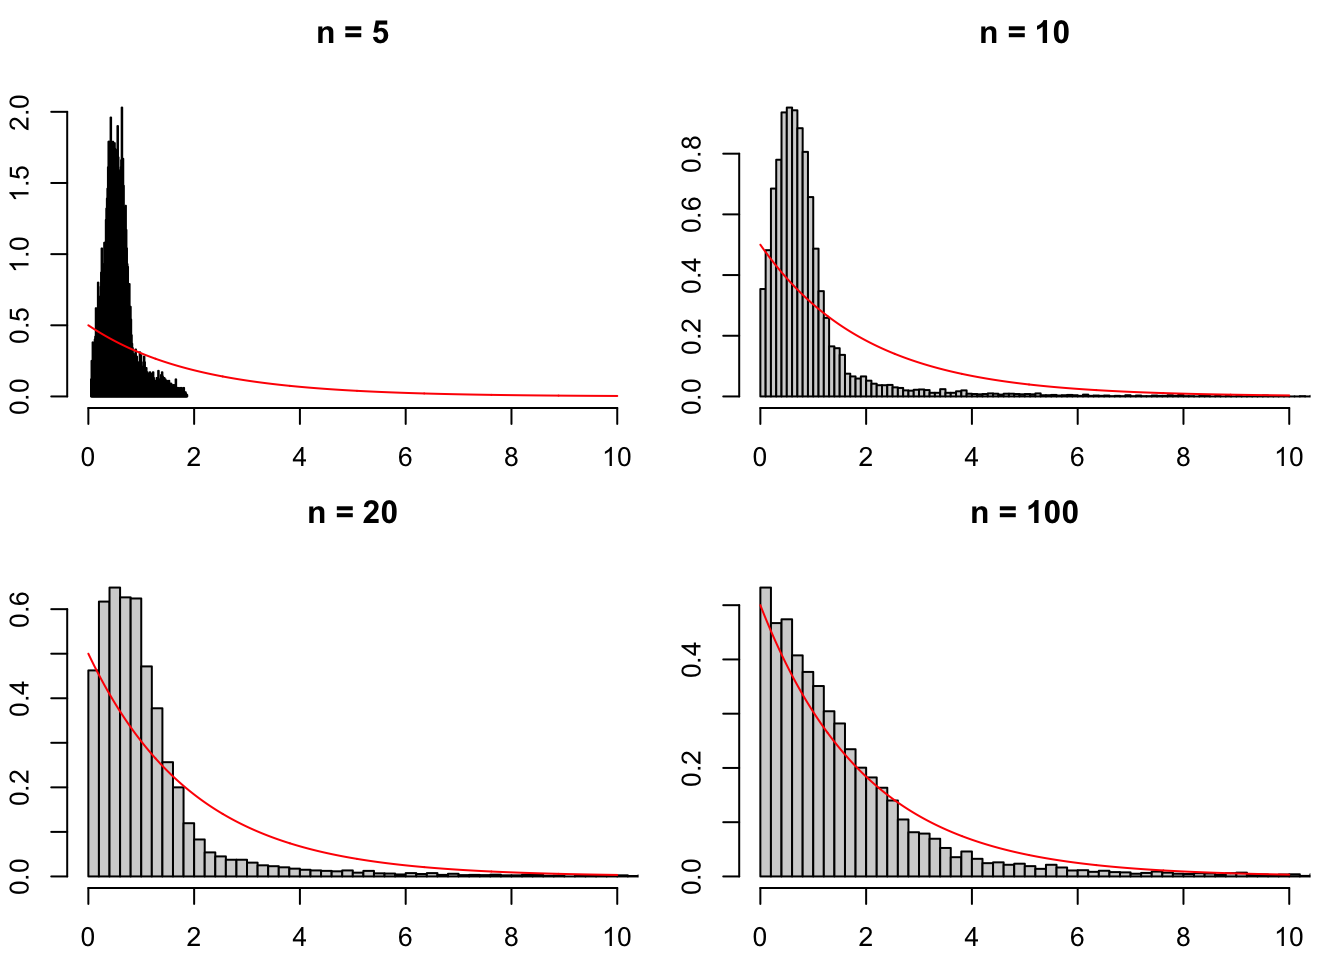
Figure 3.6: Distribution of the JB test statistic under \(H_0\) (normality).
We next draw the \(y_i\)’s from a uniform distribution, so \(H_0\) is not satisfied. Figure 3.7 shows that, as \(n\) grows, the distribution of the JB statistic shifts to the right. This illustrates the consistency of the JB test (see Def. 3.3).
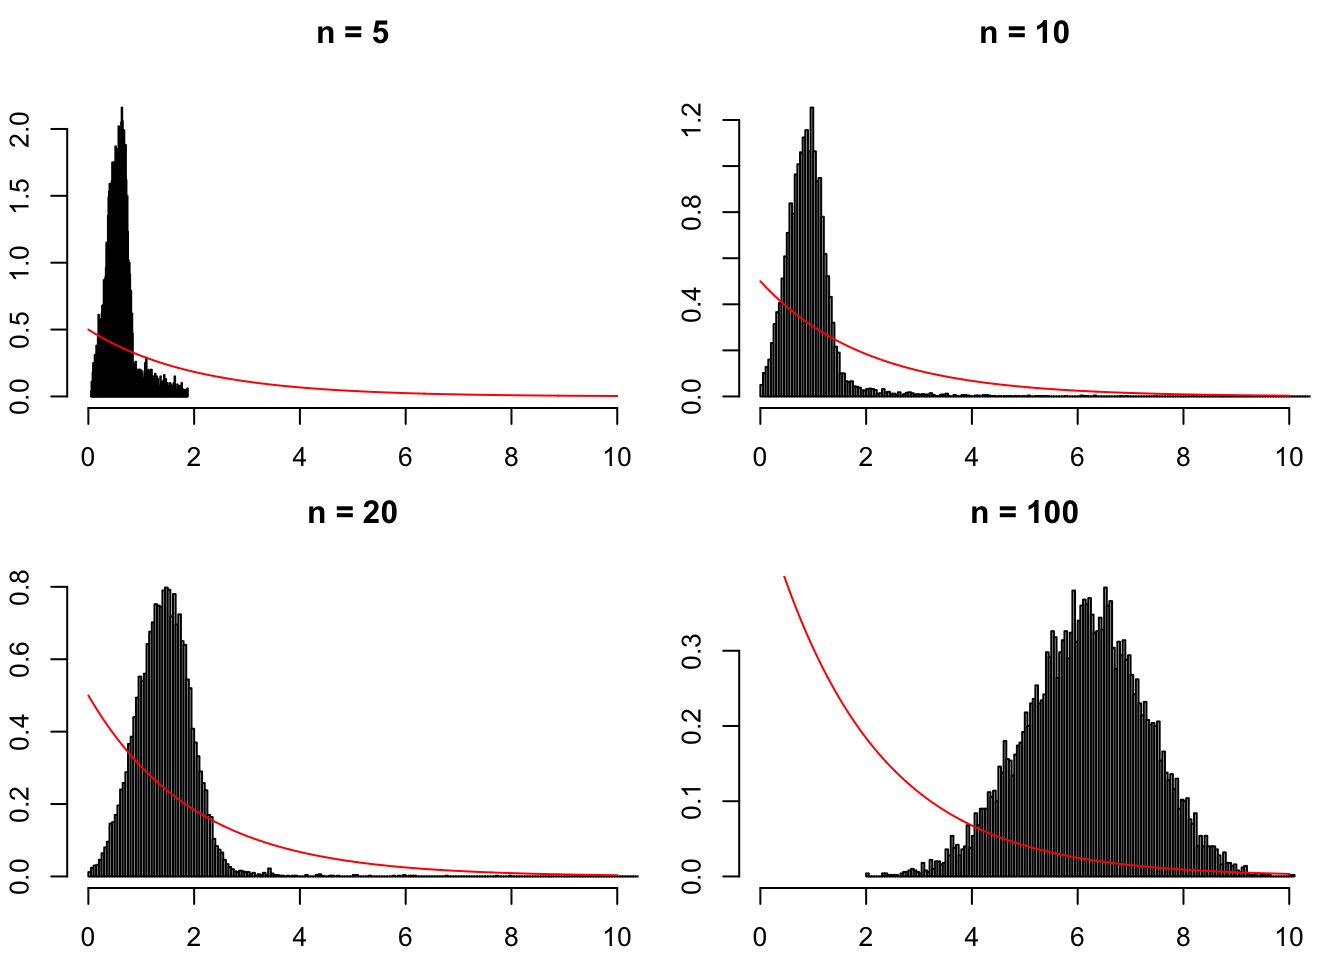
Figure 3.7: Distribution of the JB test statistic when the \(y_i\)’s are drawn from a uniform distribution (hence \(H_0\) is not satisfied).
3.5 Chapter recap
- Definition 3.1 distinguishes the rejection probability under the null (size) from the rejection probability under an alternative (power).
- Section 3.2 explains how the direction of evidence determines the rejection region and how a p-value summarizes the evidence against the null.
- Example 3.2 shows the size-power trade-off in a finite-sample decision rule.
- Definition 3.2 extends size control to tests whose null distribution is known only asymptotically.
- Definition 3.3 requires the rejection probability to converge to one under every fixed alternative.
- Proposition 3.6 combines sample skewness and kurtosis into the asymptotic Jarque-Bera normality test.
3.6 Exercises
Attempt each question and explain your reasoning, including for true-or-false statements. Foundation exercises apply a result directly; Standard exercises require several steps or a short proof; Advanced exercises combine several results or require a longer derivation. Worked solutions and exercise-specific hints are reserved for teaching sessions and are not included in this student edition.
Exercise 3.1 (Kurtosis of a Gaussian scale mixture) Advanced | Analytical
Review Section 3.
Assume that \(Z|Y \sim \mathcal{N}(0, Y^2)\) and that \(Y \sim \mathcal{N}(0, \sigma^2)\).
Compute \(\mathbb{V}ar(Z)\).
Recalling that the kurtosis of a normal variable is equal to 3, compute \(\mathbb{E}(Y^4)\).
Compute \(\mathbb{E}(Z^4 | Y)\) and deduce \(\mathbb{E}(Z^4)\).
Compute the kurtosis of \(Z\).
Is \(Z\) a Gaussian variable?
Exercise 3.2 (Testing with a normal statistic: true or false?) Foundation | True or false
Review Section 3.
For each statement, decide whether it is true or false and justify your answer.
Consider a null hypothesis \(H_0\). Under that null hypothesis, the test statistic \(z\) is \(\mathcal{N}(0, 1)\). We use a two-tail rejection region (a two-sided test in the terminology of this course) and set its size \(\alpha\) at 5%.
Using our data we get \(z = -3.2\). We reject the null hypothesis.
Under \(H_0\), the probability of making type-I errors is 5%.
The probability of making Type-II error is smaller than 5%.
The size (or level) of the test is the probability to make Type-II errors.
If I am very averse to Type-I error, I choose a low value for the size of the level.
Exercise 3.3 (Testing with a chi-squared statistic: true or false?) Foundation | True or false
Review Section 3.
Consider a test with statistic \(z\). Under the null hypothesis (\(H_0\)), \(z\) follows a \(\chi^2(7)\) distribution (chi-squared with 7 degrees of freedom; see table below). The rejection region is in the upper tail (a one-sided test in the terminology of this course).
For each statement, decide whether it is true or false and justify your answer.
If \(z \ge 10\), we always reject the null hypothesis at the 5% significance level (test size \(\alpha=5\%\)).
If \(H_0\) is valid, and when the test size (\(\alpha\)) is 10%, the probability of making a Type I error is 10%.
The power of the test is necessarily greater than the size of the test.
Under \(H_0\), the probability of having \(-1.96<z<1.96\) is approximately 95%.
If the p-value of the test is 1.5%, we reject \(H_0\) at the 5% significance level (test size \(\alpha=5\%\)).
Use the chi-squared quantiles reported in the statistical tables of the Appendix.
Exercise 3.4 (Size, power, and sample size) Standard | Calculation
Review Section 3.1.
Let \(X_1,\dots,X_n\) be i.i.d. \(\mathcal{N}(\mu,4)\). Consider \(H_0:\mu=0\) against \(H_1:\mu>0\). The test rejects when \(\bar X_n>c_n\).
- For \(n=25\), choose \(c_n\) so that the test has size \(5\%\).
- Compute the power of this test when \(\mu=0.5\).
- Keeping a 5% significance level, find the smallest integer \(n\) that gives power of at least \(90\%\) when \(\mu=0.5\).
- Explain why reducing the significance level while holding \(n\) fixed reduces power at every fixed alternative \(\mu>0\).